
Introduction
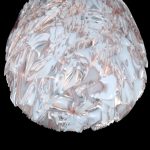
The Vertigo Lamp is a popular and unique home décor piece that adds a touch of elegance to any room. It is known for its mesmerizing design that creates a sense of movement, lightness, and magic. This lamp is created by French designer Constance Guisset, who was inspired by the feeling of vertigo – the sensation of standing still but feeling like you’re spinning or falling.
The Vertigo Lamp is made of polyurethane ribbons attached to a steel frame, creating a voluminous, swirling effect. While the original Vertigo Lamp is priced at around $1,000, you can create your own DIY version at a fraction of the cost.
In this article, we will guide you through the process of making your own Vertigo Lamp step by step. You don’t need any special skills or tools to create this stunning statement piece, just a little bit of patience and creativity.
Materials and Tools
Before you begin, make sure you have all the materials and tools you need to create your Vertigo Lamp.
Materials:
- Polyurethane ribbon
- Steel wire or hula hoop
- Paperclip
- Lamp cord with bulb socket
- Lamp cord kit
- Wire cutters
- Measuring tape
- Scissors
- Pen or marker
- Metal file
Step 1: Creating the Steel Frame
The first step in creating your Vertigo Lamp is to create the steel frame. You can either use a wire or a hula hoop, depending on how large or small you want your lamp to be.
1. Using your measuring tape, measure the length of the steel wire or hula hoop. You want the frame to be wide enough to create a voluminous effect, but not too wide that it becomes difficult to attach the ribbon.
2. Once you’ve measured the length, use your wire cutters to cut the wire or hula hoop.
3. Lay the wire or hula hoop flat on a surface and begin bending it into a circular shape. You may need to use your metal file to smooth out any sharp edges.
4. Create a small loop at the top of the frame, using a paperclip. This will be used to hang the lamp.
Step 2: Cutting the Polyurethane Ribbon
The next step is to cut the polyurethane ribbon into the appropriate lengths for your lamp. You may want to play around with different lengths to see what works best for the size of your frame.
1. Using your measuring tape, measure the length of the frame from top to bottom. Subtract a few inches to that measurement so that the ribbon won’t touch the ground when you hang it.
2. Once you have the length, use your pen or marker to mark the ribbon.
3. Use your scissors to cut the ribbon to the appropriate length. Repeat this step until you have enough ribbon pieces to cover the entire frame.
Step 3: Attaching the Ribbon to the Frame
The third step is to attach the ribbon to the frame. This is where the magic of the Vertigo Lamp begins to take shape.
1. Take one of the ribbon pieces and fold it in half.
2. Attach the folded end of the ribbon to the top of the frame, using a paperclip. Make sure that the ribbon is secured tightly to the frame.
3. Take one end of the ribbon and wrap it around the frame, attaching it to the other end of the ribbon using a paperclip. The ribbon should now be hanging from the frame.
4. Repeat steps 1-3 until all the ribbon pieces have been attached to the frame. Make sure that the ribbon pieces are evenly spaced out.
Step 4: Hanging the Lamp
The fourth and final step is to hang the lamp. This is where the lamp cord kit comes in handy.
1. Thread the lamp cord through the small loop at the top of the frame.
2. Attach the lamp cord kit to the cord, following the instructions on the kit.
3. Screw in a lightbulb into the socket.
4. Find a suitable place to hang your Vertigo Lamp and enjoy the mesmerizing effect of the swirling ribbon.